
DIY December
Want to kick off December with something fun and creative? Here are seven days of DIY winter crafts for an exciting start to the month! Some of the necessary craft supplies are available from the K-State Campus Store, see links within each project.


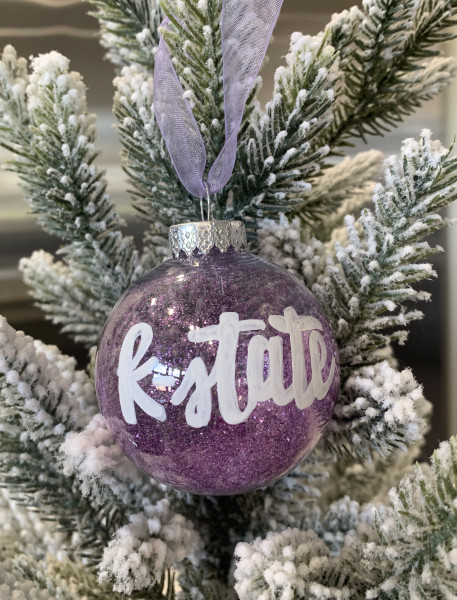
These simple yet stunning DIY glitter ornaments are so fun for the holidays! Make them for yourself or give as a gift this year—without breaking the bank!
 Things you’ll need:
- Clear ornament
- Glitter
- Floor cleaner
- String or ribbon of choice
- Paint marker (optional)
Directions:
Step 1: Open your ornament and pour a small amount of floor cleaner into the top. Move ornament around until entire inside of ornament has solution on it. Add more cleaner as needed.
Step 2: Pour excess cleaner back into the container. Make sure there is not cleaning solution sitting at the bottom of the ornament or glitter will be absorbed at the bottom.
Step 3: Pour a small amount of glitter into the ornament, then add more as needed. For less mess, use a small funnel or roll a piece of paper to use while pouring the glitter. Roll ornament around to allow glitter to cover sides. If there is too much glitter inside the ornament after covering all areas, pour out the excess. Let sit for about 5 minutes or until solution is dry.
Step 5: (Optional) Use a paint marker to draw a design. Let dry.
Step 6: Cut desired length of string or ribbon to tie at the top of the ornament.
Step 7: Decorate with your new holiday glitter ornament!
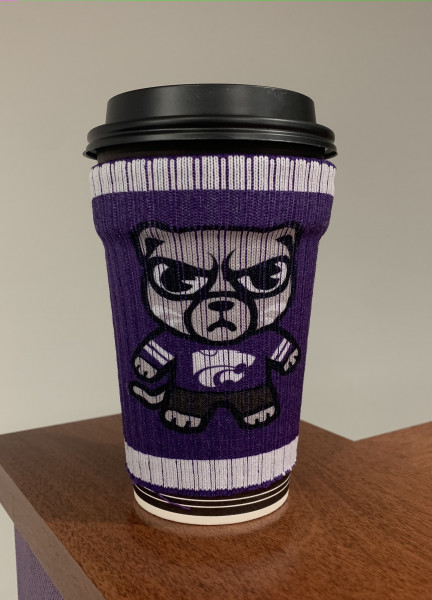 Coffee lover? Wanting to enjoy a hot chocolate in style? Make this easy sock coffee cozy in under 5 minutes!
Things you’ll need:
Directions:
Step 1: Pull the sock onto your coffee mug and use the marker to mark where you want the bottom of the cozy to be. If you are wanting to hem the bottom, add an extra half inch.
Step 2: Cut the sock where you marked it.
Step 3: (Optional) If you want a hem, fold under the half inch of the raw edge and stitch it in place.
Step 4: Pull the cozy onto the cup and enjoy your drink!
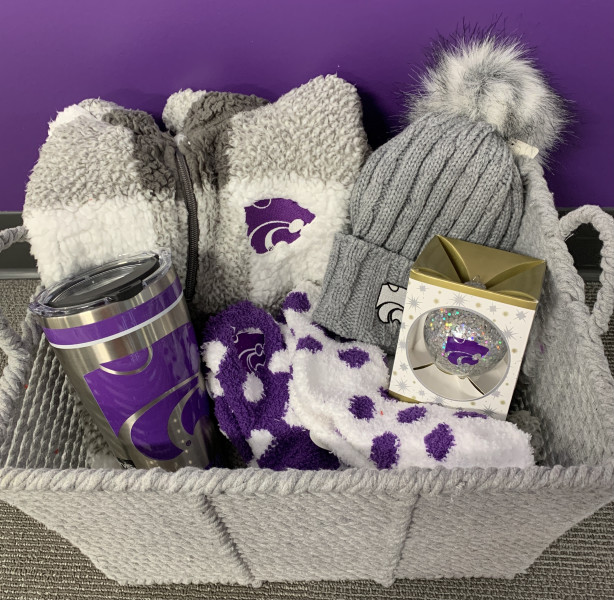 Need an easy gift idea that any Wildcat fan will love? Head to the K-State Campus Store to pick up goodies to fill a DIY gift basket!
Things you’ll need:
- Basket
- K-State gear from the K-State Campus Store! Score discounts on your items with Pocket Points or a K-State Alumni Association membership.
Directions:
Step 1: Find a basket of your choice.
Step 2: Fill basket with various items – all the items in this photo can be found at the K-State Campus Store. Shop in-store or online at kstatecampusstore.com.
Link to items:
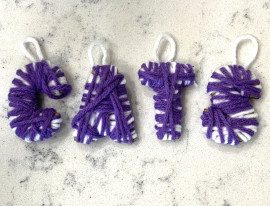
Yarn letter ornaments add a personal touch to any celebration! Use as a hanging decoration or personalize your holiday gift wrapping by using the ornament as a gift tag!
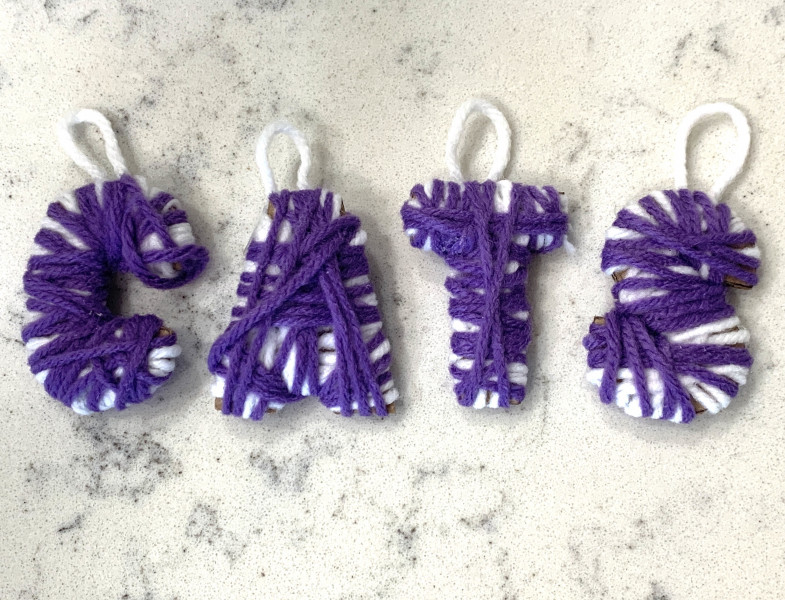
Things you’ll need:
- Cardboard
- Marker or pencil
- Glue
- Scissors or craft knife
- Yarn
Directions:
Step 1: Get a piece of cardboard and draw the letters you want to cut out. After your stencil is drawn, cut out the letters.
Step 3: Once the letters are cut, glue the start of the yarn to the cardboard so it is secure.
Step 4: After the glue is dry, wrap the cardboard with yarn until the entire letter is covered. Add an additional dot of glue where the yarn ends to keep everything in place. Continue process for additional letters.
Step 5: Make a small loop of yarn and glue it to the back of the ornament to hang.
Take your decorating to the next level with this DIY embroidered canvas! Create a personalized design to decorate your walls or give to a friend as a thoughtful gift!
 Things you’ll need:
- Canvas
- Pencil or printer for design
- Embroidery needle
- Embroidery thread
- Optional: permanent marker, paint or whatever you'd like to use to decorate the background
Directions:
Optional: If you want your painted or drawn background to be under the embroidery, do that now. Otherwise, background elements can be added after the embroidery.
Step 1: Lightly pencil a design on your canvas or print out a design and tape it to canvas. Note: make sure the wooden frame on the back of the canvas isn’t too thick since that will limit the space to embroider.
Step 2: Using your needle, trace the design by poking holes through the canvas approximately 1cm apart. (If you are using a small canvas or creating an intricate design, you may want your holes to be closer together.)
Step 3: If you taped a printed design to your canvas, remove it at this time.
Step 4: Knot the embroidery thread and use the needle to bring it back to front through the first hole. Continue embroidering with the backstitch method, using the holes as a guide.
Step 4: Once design is complete, tie a knot in the thread to secure design. If you want, tape the knot and any excess thread to the back of the canvas to keep the stitches tight.
Step 5: If you didn't do so before embroidering, use a marker, paint or other art supplies to add details to canvas.
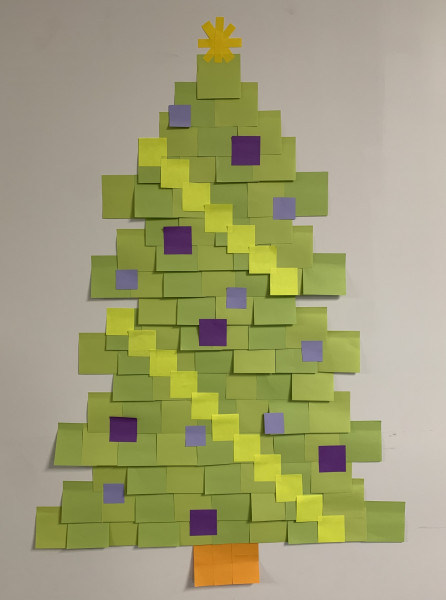 Want to spice up your home office or looking for a no-mess holiday craft? Easy fix! Grab some sticky notes and make your own sticky note tree!
Things you’ll need:
- Sticky notes
- Green – 3 in. x 3 in. (standard size)
- Dark purple, orange and bright yellow – 2 in. x 2 in.
- Yellow star – standard size cut into 4 strips
- Light purple – standard size cut into 4 squares
Directions:
Step 1: Start at the bottom of the tree and work left to right. Place a row of standard sticky notes in a straight line.
Step 2: Move up and start the next row so it is slightly overlapping and staggered from the bottom. This row should be a little shorter overall. Repeat for the third row from the bottom.
Step 3: Once you get to the fourth row from the bottom, start the row farther out to be the bottom of the next branch. Continue process until the tree is as tall as you want.
Step 4: For the top of the tree, place sticky notes in a descending pattern (for example: a row of four sticky notes, then three, two and one).
Step 5: After your tree is finished, add decorations with different colors and sizes of sticky notes.
- The bright yellow garland is 2 in. x 2 in. sticky notes.
- The dark purple ornaments are 2 in. x 2 in. sticky notes and the light putple ornaments are standard sticky notes cut into four squares.
- The star is a standard size sticky note cut into four strips. First, place 2 strips in an x, then place the remaining two in a + shape.
Step 6: After your sticky note tree is decorated, choose another color for the tree stump. The ones used in the photo are 2 in. x 2 in. orange sticky notes placed in a rectangle (two rows of three).
Add some excitement to your seasonal decorating or gift wrapping with these DIY popsicle stick sleds! Use as an ornament or tie with a ribbon around a gift for a personalized touch.
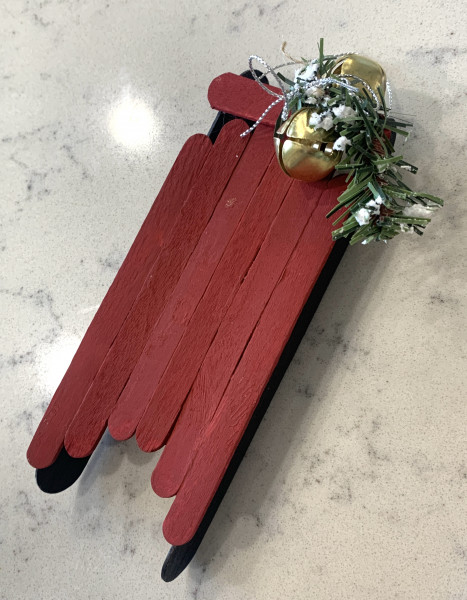
Things you’ll need:
- Small popsicle craft sticks (5) or mini craft sticks (7)
- Large craft sticks (2)
- Glue
- Paint
- Paintbrush
- Yarn or twine
- Embellishments (optional)
Directions:
Step 1: Glue four of the small craft sticks or six mini craft sticks together staggering the outsides slightly lower that the two in the middle. Allow to dry completely.
Step 2: Paint the small craft sticks any color you choose and allow to dry. This will be your sled base.
Step 3: While the small craft sticks dry, paint the large craft sticks a darker color (or you can use wood stain as well). These will be your sled runners.
Step 4: After all craft sticks are dry, glue on the sled runners to the bottom of the sled base. Allow room at the top of the sled to glue an additional small popsicle stick.
Step 5: Once dry, trim the final small craft stick to the desired length for the cross bar and glue horizontally across the front of the sled.
Step 6: (Optional) Add embellishments of your choice.
Step 7: Cut a piece of yarn or twine to your desired length and attach to the underside of the cross bar using wood glue. Let dry.
Step 8: Hang up as a holiday ornament, incorporate into your gift wrapping routine, or give as a mini gift!